Kubernetes Cluster (k3s)
Note
Kubernetes support is in beta. Feel free to use it but we suggest contacting our support before putting anything into production.
Kubernetes is an open-source system for automating deployment, scaling, and management of containerized applications. At the Flying Circus we provide a hybrid system that integrates well with our existing managed services and is based on a streamlined Kubernetes distribution called k3s.
As Kubernetes has a non-trivial amount of complexity and requires a sufficiently large amount of resources to operate properly we recommend to:
take the time to understand the foundations of Kubernetes and maybe review the k3s documentation
start by implementing our reference architecture and grow from there
The remainder of this documentation assumes that you are aware of the basics of Kubernetes and understand the general terminology.
Note
As k3s has simplified Kubernetes it also introduced new words. All the
components of the control plane (sometimes called a master) have been
pulled together into the k3s server. All the parts making up a node are
run in a process called the k3s agent. We will prefer to use the words
server and agent through the remainder of this document.
We provide version 1.23.x of k3s.
Reference architecture and minimal resource requirements
Our Kubernetes reference architecture is intended to both easily create a
standalone Kubernetes cluster for cloud native applications but also to
integrate well into existing environments.
You can run one Kubernetes cluster per resource group and we generally recommend to use separate clusters (and thus separate resource groups) for independent projects. This will give you the most flexibility and will integrate optimally into our platform aligning well on topics like access management, monitoring, SLAs, maintenance, etc.
In our reference architecture you will need at least 4-5 virtual machines with the following roles:
Frontend
Minimal resource requirements: 1 CPU, 4 GiB RAM, 30 GiB HDD, public IP addresses as needed
VM that runs the
webgatewayrole and accepts traffic from the internet.K3s server
Minimal resource requirements: 2 CPU, 8 GiB RAM, 30 GiB SSD, public IP for dashboard
VM that runs the
k3s-serverrole and provides the Kubernetes control plane with a PostgreSQL database.Can optionally run OpenVPN and limit dashboard access to VPN users.
K3s agents
Minimal resource requirements: 4 CPU, 8 GiB RAM, 30 GiB HDD
VMs that run the
k3s-agentrole and will be used to run your workloads. One node will be sufficient to get started but you will likely run two or many more for serious projects.Nodes never receive public IP addresses. All traffic from outside the resource group must pass through the webgateway.
Persistent volume storage (NFS subdir, optional)
Minimal resource requirements: 1 CPU, 8 GiB RAM, 50 GiB SSD
VMs that run the
k3s-nfsrole and are used to satisfy persistent volume claims so that pods can be moved between nodes without loosing access to their volumes.
Note
Our experiments have shown that scaling the cluster down further or using shared resources for the control plane and applications can quickly lead to cluster instability.
Interaction
In general (human) user accounts with the sudo-srv permission are granted
access to the Kubernetes cluster.
The kubectl command can be used on the K3s server directly after
login via SSH. The helm command is also available there.
The KUBECONFIG environment variable is set to a usable kubeconfig so other
user-installed tools that use that variable should work, too.
Generate Kubeconfig for External Access
To interact with the cluster from the outside, like kubectl on a remote machine,
via the dashboard or the API you need a kubeconfig file.
As user with sudo-srv permission, generate a kubeconfig on the K3s server
in the current directory by running kubernetes-make-kubeconfig:
$ kubernetes-make-kubeconfig > $USER-$HOST.kubeconfig
Warning
You must protect kubeconfig files! Access to a kubeconfig file grants unlimited access to the Kubernetes cluster!
Kubernetes Dashboard
The kubernetes dashboard is available on the K3s server and is reachable through our customer portal via the “Kubernetes” button on all resource groups with active Kubernetes clusters.
To log in, provide a kubeconfig that has been generated by kubernetes-make-kubeconfig as described above. Kubeconfig files for the dashboard must contain a valid service account token.
Cheat sheet
This is a shortened version of kubectl commands, you can look up the full cheat sheet on kubernetes.io.
Show the current configuration:
$ kubectl config view
Show all services in namespace:
$ kubectl get services
Show all pods in all namespaces:
$ kubectl get pods --all-namespaces
Show general cluster information:
$ kubectl cluster-info
Show nodes in the cluster:
$ kubectl get nodes
Networking
Our Kubernetes cluster uses flannel with the host-gw backend. Nodes
interact with each other on the SRV network and create an overlay network automatically. VMs with
specialized roles (k3s-server, k3s-agent and the webgateway) have full
access to the overlay network.
Interaction with non-Kubernetes services
Kubernetes VMs within a resource group can coexist easily with non-Kubernetes VMs and all services managed by our platform can be accessed as usual by addressing the VM names (like vm01).
Conversely non-Kubernetes VMs can not access the cluster network directly but can either access services using HAProxy (or nginx) through the frontend or can access load balanced services directly by accessing any Kubernetes VM via its name and using the associated load balancer port.
Exposing services
To expose an application running on Kubernetes (ports on a pod) to the outside world there are multiple moving parts that can be composed depending on your scenario and preferences:
Our platform-managed
webgatewayrole:uses one or more public IP addresses.
provides nginx to associate virtual hosts and terminate SSL.
provides HAProxy to load balance and pass traffic in either HTTP or TCP mode to the cluster in various ways.
automatically manages SSL certificates using Let’s Encrypt.
serviceresources that expose your application’s ports on a cluster IP/port and forward the traffic to the application pods.headless serviceresources that are used to discover pod IPs directly.load balancerservice resources that provide a port on every agent and forward the traffic to the application pods.ingresscontrollers that may (or may not) terminate SSL, do virtual host association and deliver traffic to your application’s pods.
Lets look at two typical scenarios on how to compose those:
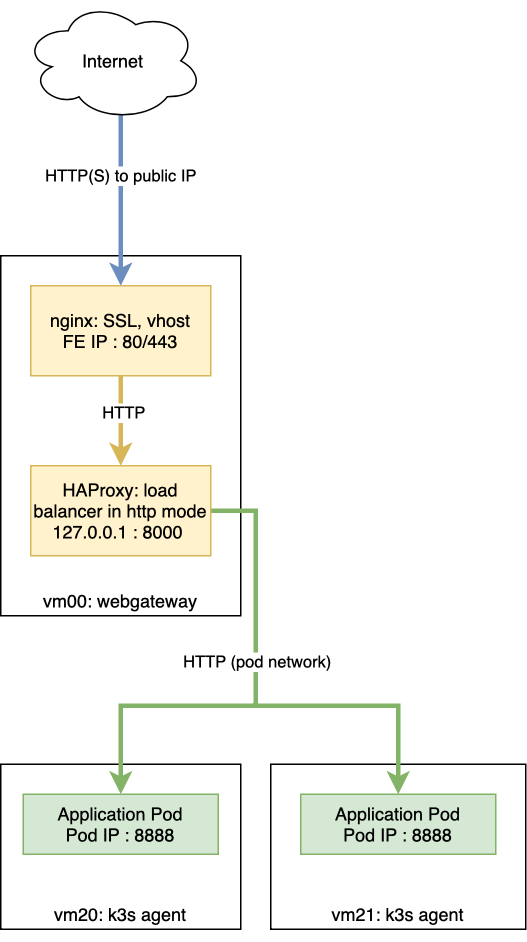
Scenario 1: HTTPS using the platform-managed nginx
In this scenario you run an HTTP application in Kubernetes and want to expose it to the outside world, having SSL termination, certificates and virtual host association managed by the Flying Circus platform without adding an ingress controller.
The setup in Kubernetes looks like this:
Add headless service providing pod IP addresses and port of your application (8888 in our example).
On the platform side, we have:
Nginx listening on the public FE interface, terminating SSL connections and doing the virtual host association.
HAProxy listening on localhost, running in HTTP mode, discovering pod IPs for the headless service via DNS and load balancing between pods.
Here’s a diagram of the setup focusing on your application’s traffic flow:
The headless myapp service could be defined as
# myapp-service-headless.yaml
apiVersion: v1
kind: Service
metadata:
  name: myapp
  labels:
    run: myapp
spec:
  clusterIP: None
  ports:
  - port: 8888
    protocol: TCP
    name: http
  selector:
    app: myapp
Note that we define the clusterIP as None which makes the service a headless one.
Our our platform, custom NixOS configuration on the webgateway VM sets up the
integration between the myapp service and HAProxy:
# /etc/local/nixos/myappfrontend.nix
{ ... }:
{

  flyingcircus.services.nginx.virtualHosts."myapp.example.com"  = {
    forceSSL = true;
    locations."/".proxyPass = "http://127.0.0.1:8000";
  };

  flyingcircus.kubernetes.frontend.myapp = {
    binds = [ "127.0.0.1:8000" ];

    # port the application is exposed on the pod.
    podPort = 8888;
  }

}
This will configure nginx for requests accessing myapp.example.com,
listening on all public IP addresses (default). Using forceSSLenables SSL
and redirects HTTP traffic automatically to HTTPS. Finally, traffic is passed
to HAProxy via the local socket.
We also configure HAProxy to listen with its frontend locally on port 8000 and
to generate backends that are dynamically populated with the pod IPs
automatically when you add/remove pods. By default, up to 10 pods are used by
HAProxy. You can change the maxExpectedPods setting described below.
See Webgateway (NGINX, HAProxy) for more details about general HAProxy and nginx configuration.
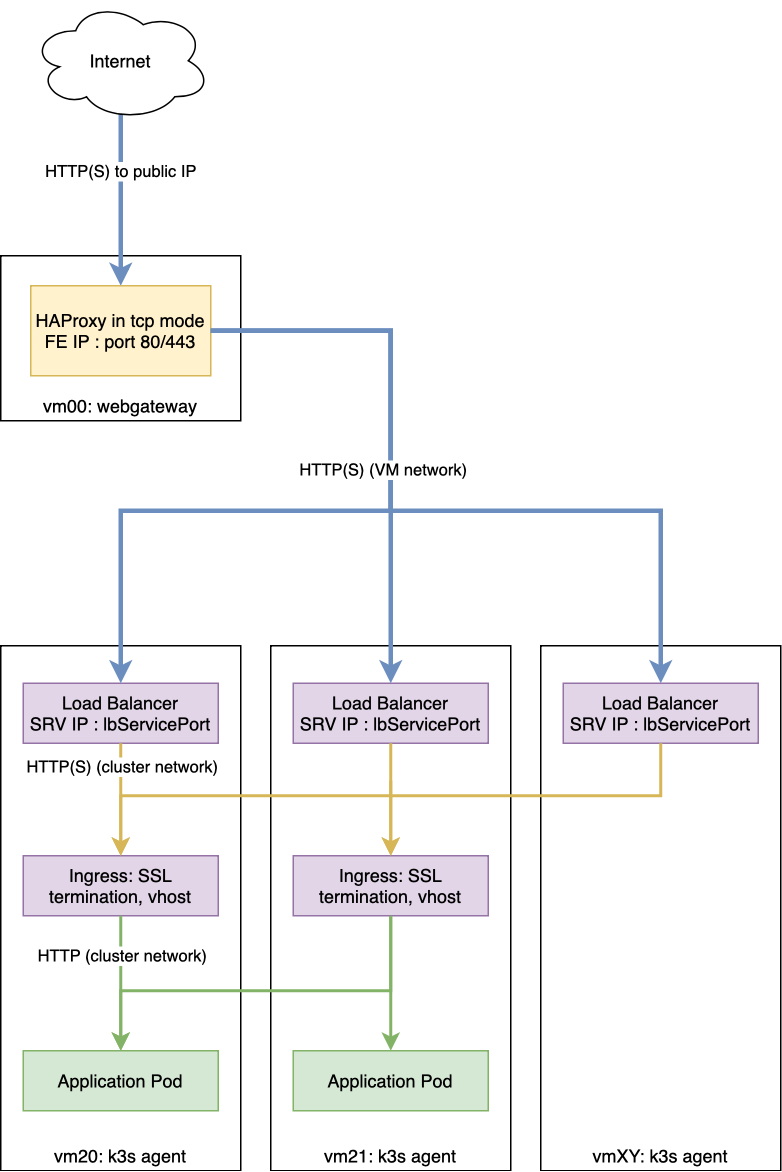
Scenario 2: TCP passed to an internal ingress controller
A second typical scenario is if you want to handle non-HTTP protocols or want to terminate SSL and virtual host configuration within Kubernetes using an ingress controller like traefik, which is installed by default.
The setup in Kubernetes looks like this:
Deploy an ingress controller or use traefik ingress installed by default (used in the example below).
Bind the ingress controller to a load balancer (port 8888 in our example).
Add a service of type ClusterIP for your application.
Deploy an ingress resource to to pass traffic to your application.
On the platform side, we have:
HAProxy in tcp mode, listening on the public FE interface, forwarding requests from the Internet to Kubernetes ingress.
Here’s a diagram of the setup focusing on your application’s traffic flow:
To connect the ingress controller service with our webgateway, both for HTTP and HTTPS:
# /etc/local/nixos/myappfrontend.nix
{ ... }:
{
  flyingcircus.kubernetes.frontend.traefik-ingress-https = {
    # HAProxy listens on a public IP address on the FE interface using the
    # standard HTTPS port 443
    binds = [ "192.0.2.11:443" ];
    mode = "tcp"

    # port the ingress controller's load balancer service is listening on
    # for HTTPS traffic.
    lbServicePort = 443;
    serviceName = "traefik";
    namespace = "kube-system";
  }

  flyingcircus.kubernetes.frontend.traefik-ingress-http = {
    binds = [ "192.0.2.11:80" ];
    mode = "tcp"

    # port the ingress controller's load balancer service is listening on
    # for HTTP traffic
    lbServicePort = 80;
    serviceName = "traefik";
    namespace = "kube-system";
  }
}
Note that in this scenario, load balancing is done inside of Kubernetes. HAProxy just forwards the TCP stream to ingress. The ingress controller is responsible for terminating SSL, managing certificates and redirecting from HTTP to HTTPS if applicable. This is different from scenario 1 where HAProxy can do the load balancing in front of the Kubernetes cluster and nginx on the frontend VM has the responsibilities that the ingress controller has in this scenario.
Configuration reference
As the individual parts can be combined in multiple ways depending on your requirements there are a few more options available:
{ ... }:

{

    flyingcircus.kubernetes.frontend.myapp = {
      # HAProxy listening on localhost, typically behind nginx (see scenario 1).
      # binds = [ "127.0.0.1:8000" ];

      # ...or

      # HAProxy listening on the public FE interface (see scenario 2).
      # binds = [ "192.0.2.11:443" ];

      # If the real service name is not `myapp`.
      serviceName = "traefik";
      # If you want to use a non-default namespace
      namespace = "kube-system";

      # Choose between http (see scenario 1) and http (see scenario 2) mode,
      # depending on the role HAProxy plays in the network setup.
      mode = "tcp";

      # Additional parameters to the generated HAProxy server entries
      haproxyExtraConfig = "maxconn 5";

      # Use exactly one of the three port options below.
      # They are mutually exclusive and depend on the service type
      # configured in Kubernetes:

      # 1. Headless service (see scenario 1).
      # Specify a pod port here. HAProxy will discover pod IPs
      # and load-balance between the pods, forwarding traffic directly to them.
      # podPort = 8443;

      # ...or

      # 2. Service with type LoadBalancer (see scenario 2).
      # Specify on which load balancer port your service is listening on.
      # lbServicePort = 80;

      # ...or

      # 3. Service with type ClusterIP.
      # Forward traffic to the service and let kube-proxy distribute the traffic
      # between pods.
      # servicePort = 8443;

      # HAProxy needs to know a limit of server entries that it will
      # generate. The default is 10 and you can adjust this as needed.
      maxExpectedPods = 5;

      # If the proxy should talk to the backend using SSL.
      # Certificates are not verified to speed up things and make things work with self-signed certificates.
      sslBackend = false;

      # HAProxy options for the server-template directive used for the pod backends,
      # added verbatim to the end of the generated line.
      extraPodTemplateOptions = "";

    };

}
Storage
Our Kubernetes environment supports two persistent volume types by default:
local
nfs-subdir-external-provisioner
The nfs subdir provisioner allows adding VMs that run the k3s-nfs to the
cluster’s resource group and will automatically be available for all nodes to
allocate separate volumes using subdirectories (instead of sharing a single big
NFS volume).
Depending on your IO requirements you can use HDD/SSD class VMs for local storage or NFS.
We also recommend to consider using our S3-compatible API for storing object data.
Known limitations
Due to our high security requirements for user passwords accessing the dashboard directly from the internet using HTTP Basic auth may be very slow. Access through the VPN is recommended in that case as it does not require basic auth protection.
Changing the VM which runs the
k3s serveris not supported and requires substantial manual intervention.Changing ports on pods and load balancers will not be picked up by our webgateway automatically for now. Adding and removing pods during deployments and while scaling does happen automatically though.
By default our setup uses a cluster network that allows 253 nodes and 253 ports per node. This can be adjusted but may require larger interventions with downtime if done in a production system.
We currently do not drain/uncordon nodes when performing service or VM restarts in scheduled maintenance windows.